Live Florida Wedding Painting, Guest Portraits and Custom Watercolor Art
  • Her Art
    • Culinary Art
    • Around Town
    • Water's Edge
  • Live Painting
  • Guest Portraits
  • Custom Work
    • Wedding Invitations
    • Custom Paintings
    • Large Canvas
    • Logo & Branding >
      • Collaborative process
    • Personal Portait Illustration
  • Meet Caryn
    • FAQ
    • Services
    • Press
    • Awards and Accolades
    • Blog
    • Contact
  • Upcoming Events
    • Classes
    • Creative Workshops
    • Private Paint Parties

Mixing Colors to Darken Them and Create Shadows

Shadow Color Exercise

Picture
In the sunlight, colors look differently then they do in the shadows. We are going to experiment to learn how to mix colors and see how they may look when a shadow is cast over them.


​Mix up a wet, pourable puddle of the following colors; Cadmium Yellow, Alizarin Crimson, Sap Green and ultramarine blue. Using a flat 3/4 to 1" brush, paint stripes of each color. Let them dry.
​
* Click on the videos to see them enlarged

As it dries, use another piece of paper to cast a shadow over half of your strips of color. Notice how the colors change... they are less intense now and darker in value.

To each color puddle on your palette, add in a little bit of Payne's Gray or Neutral Tint to darken them. Test your darker color out on scrap paper first then once you feel like it is close to the shadow color, paint it over part of your color strip. This creates darker versions of your colors that can be used as shadow sides of an object.
*The process of painting over one dry layer of color with another one to darken it is called, "glazing."

Note: Adding complimentary colors (those that are opposite of a color on a color wheel), can also be used to darken your colors and tone them down.  We will learn all about color wheels and their practical uses next week. 

Painting a Cube - Using variations of your color to show a shadow side

This lesson involves a little bit of basic perspective. But not to worry, we'll keep it simple.
  • First draw a horizon line across the lower part of your paper (basically a horizontal line), I use a triangle to make sure that my line is straight, but a ruler is fine.
  • Now draw a 1" tall vertical line below the horizon line (in the middle)
  • Draw a line from the RIGHT end of the horizon line over to the top and bottom of your 1" vertical line
  • Now do it from the LEFT side of your horizon line... over to the top and bottom of your 1" vertical line again.
  • Draw in two additional vertical lines on either side of your first 1" vertical line.
  • Draw a line from the top of each new vertical line to the opposite end of the horizon line.
  • Imagine that your light source is coming from the left side of the paper.

  • Now paint the left side one of the lightest colors on your palette from the prior exercise.
    ​You can lighten it even further with water.
  • Now paint the top of the cube a tiny bit darker then the left side.
  • The right side you will paint slightly darker then the two other sides. You can darken the paint if you'd like using Payne's Gray as we did in the first exercise. If your left side is still too light, let it dry and then glaze on another layer of paint.
  • This is a great exercise to get used to the water, modifying the colors and practice changing the lightness and darkness (value) of an object.

Homework

Picture
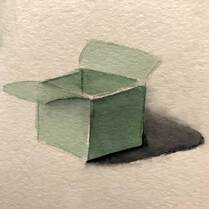
Draw another cube using the same method. This time add on to it to make it into a scene or object. I painted my cube into a box, but yours could be a house, a piece of cake, an ice cube, a barn, or even a couple of books standing on their end. Really anything in a cube shape.

Once it is drawn, then paint in your new shape making sure everything on the side of your light source is lighter and darkening your paint for the "in-shadow" parts.

follow @weddingwatercolors on instagram
Picture
Picture
Picture
Picture
407-421-3198 or via e-mail at  [email protected]
  • Her Art
    • Culinary Art
    • Around Town
    • Water's Edge
  • Live Painting
  • Guest Portraits
  • Custom Work
    • Wedding Invitations
    • Custom Paintings
    • Large Canvas
    • Logo & Branding >
      • Collaborative process
    • Personal Portait Illustration
  • Meet Caryn
    • FAQ
    • Services
    • Press
    • Awards and Accolades
    • Blog
    • Contact
  • Upcoming Events
    • Classes
    • Creative Workshops
    • Private Paint Parties