Using surface shading and shadows to create dimension
In this lesson, we'll discuss the difference between surface shading and cast shadows. They can both be used to help give your still life objects life, depth and dimension.
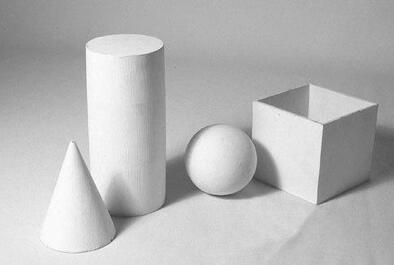
When creating still life objects, it's important to know that all objects in a composition have a shape or outline. This is what we commonly call, shape. For example, a box is a cube made up of square surfaces. A plate is a circle made up of concentric circles. These same objects are all treated differently when it comes to their shading to make them look realistic.
This shading is what causes the objects in a composition to appear three-dimensional. Think for a minute about the different shapes we all commonly know; square, circle, rectangle, square etc. These are the surface outlines.
Surface Shapes themselves are made up of shading inside of the outlines to make your objects look: flat, half round, cylindrical, domed or concave.
In this lesson, we detail how shading is different from cast shadows. As we learned a few weeks ago, the cast shadow of an object occurs when the path of light from the light source is interrupted or blocked. Shadows seldom fade out as much as shading does. Shading is actually on the surface of the object itself (not underneath it). The thing that shadows and shading both have in common is that they are both depicted from how and where the light hits your object.
Surface shapes are shown by the contrast between shaded and highlighted areas. Shading fades gradually from light to dark. When shading, always be aware of the location of your light source.
For the following surface shading ‘rules’ imagine that their is a fixed light source in the upper left corner that is coming down at an angle. These rules are foundational. They can be used like a formula for shading. Every object you render will have one or more of these surface shapes. Once you know them, you will be able to render any scene you want.
Surface shading different shapes to understand
|
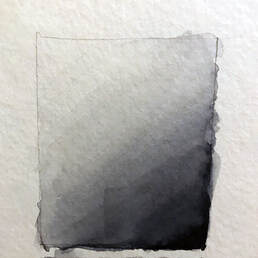
Flat
Shading occurs in lower right, fading as it moves to the upper left or toward the light source. Shading goes from edge to adjacent edge, perpendicular to the light source. On a flat surface, shading is straight across at a diagonal angle. Shading should fade to light or dark by about the halfway point. Regardless of the outline shape, the treatment of a flat surface is the same. Just moving from corner to opposite corner darkening or lightening as you go.
|
|
|
|
|
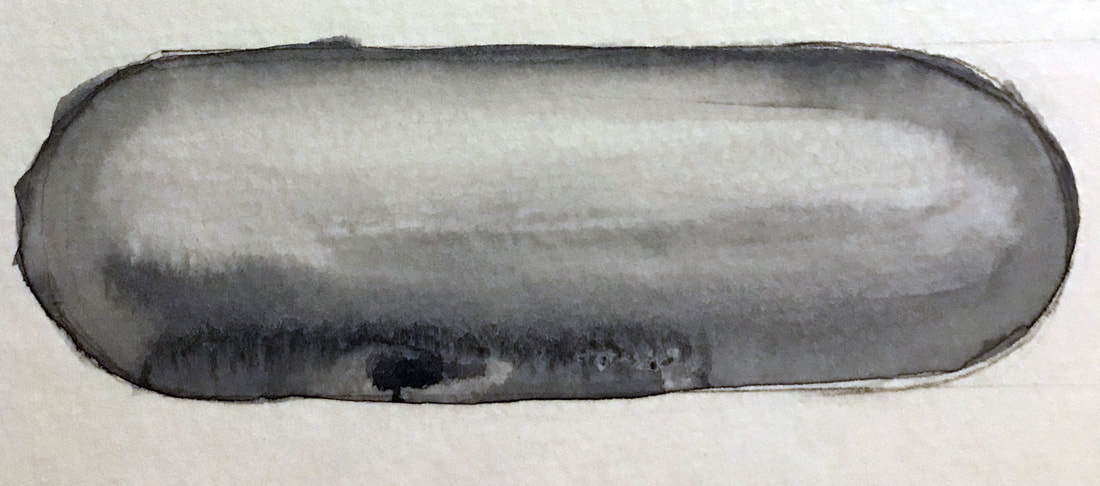
Half Round
To envision what this shape looks like, imagine a cucumber or carrot cut in half along the length. Shading occurs on both sides of the piece. The highlight area should be oriented along the top with the light source. The same treatment would be applied to a full pill shape. |
|
|
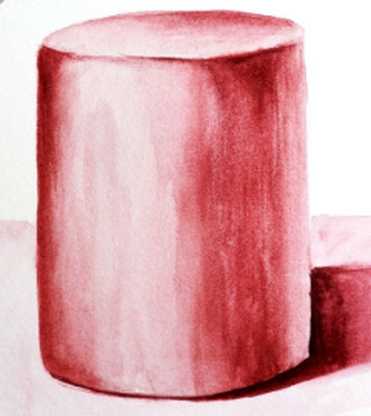
Cylindrical
You can think of something as big as a silo or small as a can of soup for this surface shape. In this case, shading occurs along both sides and gradually fades to light in the center. Take care not to make the highlight in the very center, but off to one side or the other slightly. This will make it look a little more natural. We use this cylindrical treatment when we paint pots, cans or bottles of any kind. * The shading on the top of this example is treated like a cone as if it was a silo. If the top of your cylinder is flat (like a coke can) then the top would be treated like the Flat surface shape below. |

|
|
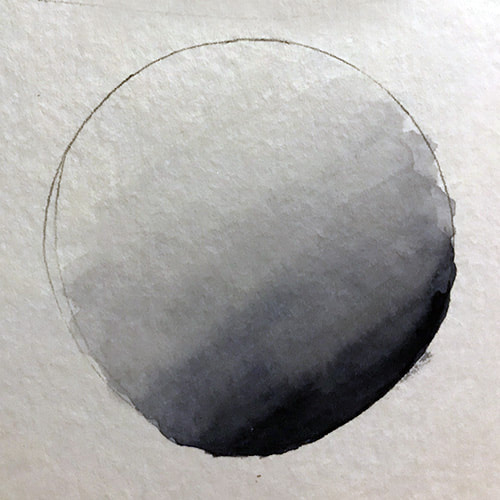
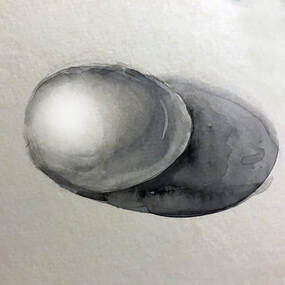
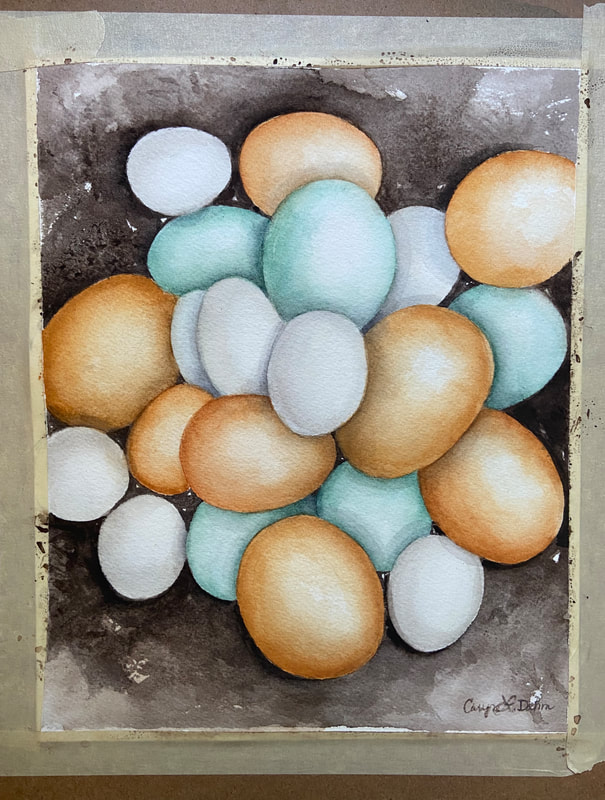
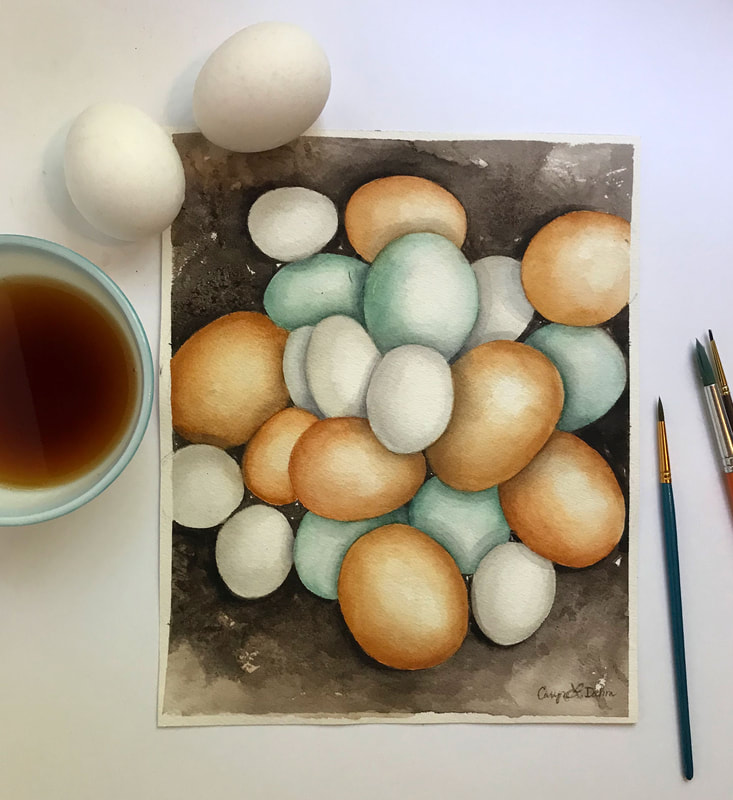
Dome Shaped and Round
Shading occurs around the outer perimeter of the object. Your highlight area is slightly left or slightly right of center, oriented with the light source. This is like how we painted our lemons and in this example further down, eggs. |
|
|
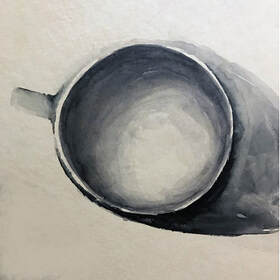
Concave
This one is my favorite. The shading again occurs around the outside perimeter of the piece, but this time the highlight area is in the lower right of center. Use this in painting a wooden spoon, bowl or the inside of a cup. |
|
Ask yourself these questions when beginning a rendering:
Where is my light source?
What surface shape is my object?
Where does the light strike it?
Where is my light source?
What surface shape is my object?
Where does the light strike it?
To note: The first video does now use sound. Click on the videos to enlarge them.
|
|
Creating Surface Shapes using Watercolors
When creating shading with watercolors, I typically start by laying down my mid toned areas and using a clean brush loaded with water to blend the color out into light highlights. Continuously render your surface shapes by glazing on successive layers. Be sure to let each layer dry first. You can also darken your color by using more intensity of pigment (less water) or by using Paynes gray, neutral tint, burnt umber or the complimentary color. Most often, using the complimentary color (opposite color on the color wheel) darkens a color in a more natural looking way. |
|
Shading a white object with subtle color, can be tricky. Take it easy and remember to use lots of water and light values.
|
|
A bit more about using cast shadows to create dimension
|
Adding a subtle cast shadow on your surfaces themselves (over your surface shading) can also be necessary when the light is being blocked by another object. This can be done gently without "erasing" the work you've done on your surface shading. Just make sure your earlier layers are completely dry, then dive in without over working or scrubbing.
|
|
|
|
In the video on the left, I'm adding a little more shadowing on a white egg surface to differentiate where one egg overlaps another egg.
|
|
Don't forget to add your darks underneath your objects ... the CAST shadow helps to give that impression that your object is resting on a surface and not floating in thin air. It grounds it and gives weight to your shapes.
|
|
For extra practice and information:
Check out this excellent and simple video to see 3 different but effective approaches to accomplish shading by Mr. Otters Studio: https://www.youtube.com/watch?v=-dz0-40t2l8
Check out this excellent and simple video to see 3 different but effective approaches to accomplish shading by Mr. Otters Studio: https://www.youtube.com/watch?v=-dz0-40t2l8
How should you paint these techniques?
Just remember that their are multiple "correct ways" to move the paint around to accomplish surface shading. It comes down to what feels the most comfortable for you.
Just remember that their are multiple "correct ways" to move the paint around to accomplish surface shading. It comes down to what feels the most comfortable for you.
Homework
|
For Homework
As your exercise for this week, practice mastering one of these surface shapes. Choose one that troubles you the most when you paint. - Enjoy whatever color you want to use. - Practice painting the surface shape by first drawing the geometric outline of a shape (an oval, square, cylinder etc.) - Next use your watercolors to shade the shape. - Now get creative and start on a new piece of paper painting and shading an object that uses the surface shape that you studied. For example if you studied a Flat object, you could paint a box a book or a phone. |